
As I mentioned earlier this year, the lovely Mrs. PDF and myself were planning a move into a larger, and nicer, house than the one we’re in.
Well, due to circumstances beyond our control, that house slipped out of our grasp. The bitch of it is, I was already boxed up and ready to go, and had bought a brand new steel shelf unit to house my A/V gear (and maybe at least part of my game collection), as well as some rope lights for some mood lighting.
Despite having only 12×12 feet to work with, an L-shaped computer desk whose sides measure 5 feet across, a freakin’ huge new piece of furniture to incorporate, and being stuck with having to jam a twin bed, a dresser and the litterbox into this room with my goodies (as my cats sleep in this room and, paradoxically enough, when I’m in the doghouse, so do I)…I am embarking on a redesign of my room anyway.
My criteria are:
- Mood lighting: There’s only one overhead light in the room, and I’ve made a few provisions to backlight marquees, but there’s really not much else. I don’t like direct light – I like to hide the light source and bounce the light off of the walls and ceilings, and I like dim light, nothing too overpowering. In such a small space, this isn’t terribly feasible, so I’ll settle for my other favorite lighting element: color.
- A/V equipment: The real reason behind the new shelf unit, the A/V gear is something that actually makes me money, and the new shelf is open on all sides (and the shelves themselves are grated), allowing for ventilation, which is a severe problem in here.
- Show off the collection: Well, as much as I possibly can with a room the size of the space shuttle’s flight deck. It’s not all for show, either – it’s nice if the games are accessible, and important that I can punch up what I’d refer to as my “major consoles” pretty quickly. Stuff like standalone dedicated consoles aren’t really prime contenders for this limited real estate.
- Get the PC out of the corner: That’s where I spend most of my time. One of my main goals is to get the computer out of the corner, so I can be facing some space instead of a wall when I’m there. And the closer I can move it to the one window in the room, the better, so I can get some real live sunlight in there and see storms coming in (actually kinda important in this part of the country).
- Come up with something that isn’t so wild that I’ll wind up being divorced and having to move it all again in a few months anyway. Self-explanatory.
I know it’s gonna be cramped. It already was to begin with. With the new shelf, though, it’s gonna be cramped cramped – zero G would be a big help, because then I could put the bed on the ceiling and get it the hell outta my way. As it is, the space shuttle analogy won’t be entirely out of place.
I’ve come up with a new layout that will alleviate some of these problems, and maybe – God willing – put my computer desk right in front of the window.
I’ll provide updates here so those who care can chart my progress, and laugh at the sardine can I use for a game room/office/spare bedroom/kitty playground.
Phase 1
Brought in the steel shelf unit, and loaded all of the A/V gear into it. I like. Blue rope lighting installed up underneath the rim of each shelf so I have mood light and the minimal work light I need to operate gear which, for the most part, provides plenty of its own light – this is going to be LED grand central station. Good God, but I’ve got a ton of crap to put in here. Seen here with and without room lighting:
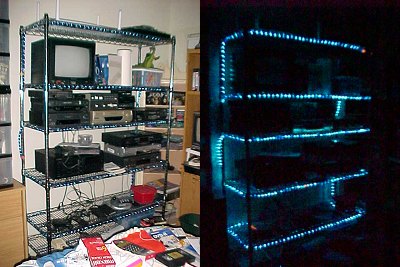
Not everything is in its final place here; the A/V gear certainly won’t be as crunched together as it might appear here.
That’s really the extent of my progress for day 1. I know it doesn’t look like much, but you try unhooking, moving, and starting to reconnect an entire small-A/V-studio setup. More to come soon. Enjoy, and feel free to share suggestions – that is, suggestions that will work in that size room.


+ There are no comments
Add yours